A variant of the Evolution email client for Linux is available which utilizes the Exchange-native Exchange Web Services (EWS) API to access and manage Exchange mailbox content, including Calendar data. For Linux users, this represents the best available option for connecting Office 365 Exchange Online aside from the Outlook Web App.
(Note that this information is provided for informational purposes only. This is not an officially supported client in our environment.) Continue reading
Category Archives: Uncategorized
Talking to SQL via PowerShell
Interacting with a SQL database from PowerShell is pretty simple. In the example I give below, it is assumed that 1) the appropriate ODBC data source has been configured on the machine from which the commands are being executed, and 2) the account under which the script commands are being run has the appropriate privileges on the SQL database.
First of all, let’s define a few variables:
$dataSource = “sqlserver.domain.com”
$database = “MyDB”
$auth = “Integrated Security=SSPI;”
$connectionString = “Provider=sqloledb; ” +
“Data Source=$dataSource; ” +
“Initial Catalog=$database; ” +
“$auth; “
Now, here’s the really critical variable: the SQL query itself.
$sql = “SELECT * FROM tbl_MyTable”
Now for the heavy lifting, where we instantiate an OleDb database connection object, populate it with the appropriate parameters, and tell it to do its thing:
$connection = New-Object System.Data.OleDb.OleDbConnection $connectionString
$command = New-Object System.Data.OleDb.OleDbCommand $sql,$connection
$connection.Open()
$adapter = New-Object System.Data.OleDb.OleDbDataAdapter $command
$dataset = New-Object System.Data.DataSet
[void] $adapter.Fill($dataSet)
$connection.Close()
$rows=($dataset.Tables | Select-Object -Expand Rows)
That really is all that there is to it. The returned rows are all in the $rows variable, ready for whatever munging you need to do.
Happy PowerShelling….
Exchange Online Mailbox Access from PowerShell via REST.
- In production, the API endpoints have different URLs.
- Basic authentication is no longer supported with the REST API. Instead, OAuth2 must be used (which is something of a pain to get working in PowerShell).
Hopefully, I’ll soon have a new article addressing these changes.
When I recently attended the 2014 Microsoft Exchange Conference here in Austin, I found myself frequently having to pick and choose between simultaneous sessions that were of interest to me. Since we are early in the planning stages of upgrading our on-premise Exchange 2010 infrastructure to 2013, I tended to steer towards sessions that would help me on the project. Until I saw a recent blog post by Glen Scales, I had little clue about just what I was missing.
It turns out that Microsoft has rolled out a preview release of a new REST-based API for Exchange Online. It is largely incomplete at this point, but it is very simple to learn, and it is easily leveraged from within PowerShell. Glen’s blog article makes mention of PS version 4 being required, but version 3 is sufficient. This is to have access to the Invoke-RestMethod cmdlet that was added in version 3.
Now, having been an Exchange administrator for the last decade and a half, it has been a while since I have kept abreast of the latest and greatest offerings in the world of programming. When I first saw Glen’s post, I had to do a little research to bring myself up to speed on what the heck REST is. It is essentially a light-weight alternative to SOAP/XML-based web services. Whereas web services generally involve submitting (via the web) an XML bundle containing the commands to be executed and any data being submitted, with the results coming back as another XML blob, REST pretty much encodes the commands in the URI being accessed (with associated data being sent along in a JSON or XML blob), with the response coming back in XML or JSON format. The preview API being discussed here returns data primarily in JSON format, with a handful of exceptions. (Happily, using REST through PowerShell causes the returned JSON data to be stuffed into a structured PowerShell object, so we have no need here to go over how to parse JSON. If we had to, fortunately, PowerShell does include the ConvertTo-Json and ConvertFrom-Json cmdlets, but I don’t explore those in this article.)
Here is a quick and dirty run-through of some of the basics, starting off with retrieving the list of available “entities” and “actions” (somewhat equivalent of retrieving the WSDL for SOAP/XML). While this can be done via PowerShell, it is simpler to navigate the results by pointing a web browser to https://outlook.office365.com/EWS/OData/$metadata and authenticating when prompted. (ADFS authentication works fine, here.) The entities listed (presented in XML format) are the objects which can be read and manipulated, along with their attributes. Actions are the verbs that can be invoked.
Before we dive into some actual examples of invoking REST calls through PowerShell, I should note that there are two methods of encoding into the URI what mailbox is being manipulated. One is to default to the mailbox associated with the authentication credentials used by invoking the “/Me” path:
https://outlook.office365.com/ews/odata/Me
The other is to explicitly specify the mailbox via its SMTP address (assuming that the authenticated account has either Full Access privileges on the mailbox or appropriate sharing privileges on the folder being accessed) as follows:
https://outlook.office365.com/ews/odata/Users(‘username@domain.com’)
The entities and actions to be performed on those entities are then appended to the URI as shown in the examples which follow. We’ll start out by establishing our authentication, then retrieving a list of unread messages in the authenticated user’s Inbox:
PS C:\> $cred = get-credential
cmdlet Get-Credential at command pipeline position 1
Supply values for the following parameters:
Credential
PS C:\> Invoke-RestMethod -Uri "https://outlook.office365.com/ews/odata/Users('its.jimi.hendrix@austin.utexas.edu')/Inbox/Messages?`$filter=IsRead eq false" -Credential $cred | foreach-object{$_.value | select Sender,Subject,DateTimeReceived}
Sender Subject DateTimeReceived
------ ------- ----------------
@{Name=Test Mailbox; Address=testm... This is a test 2014-04-29T20:47:35Z
@{Name=Test Mailbox; Address=testm... Have you read me? 2014-04-29T19:40:31Z
Note that I am only displaying a handful of attributes for each message. Let us take a closer look at one of the messages to see the full gamut of information retrieved, also demonstrating the use of subject keyword filtering. We’ll store it into a variable so that we can work more with it. I’ve chosen a test message whose body is in plain text format to keep the size small for display clarity:
PS C:\> $message=Invoke-RestMethod -Uri "https://outlook.office365.com/ews/odata/Users('its.jimi.hendrix@austin.utexas.e
du')/Inbox/Messages?`$filter=contains(Subject,'test')" -Credential $cred | foreach-object{$_.value }
PS C:\> $message
@odata.id : https://outlook.office365.com/EWS/OData/Users('its.jimi.hendrix@austin.utexas.edu')/
Messages('AAMkADQ0MWIxYThmLWE4YzItNDM4MS1hOTM0LTBhY2MzNGMzYmQwYQBGAAAAAACM0mZeOZNpTo
cvyM47SvruBwBCjm8X6K-UR7VnjIWDMRNeAAAACWCRAADsGKiQ9_bQQ6Ey8tGr9WOeAADjdompAAA=')
@odata.editLink : https://outlook.office365.com/EWS/OData/Users('its.jimi.hendrix@austin.utexas.edu')/
Messages('AAMkADQ0MWIxYThmLWE4YzItNDM4MS1hOTM0LTBhY2MzNGMzYmQwYQBGAAAAAACM0mZeOZNpTo
cvyM47SvruBwBCjm8X6K-UR7VnjIWDMRNeAAAACWCRAADsGKiQ9_bQQ6Ey8tGr9WOeAADjdompAAA=')
Id : AAMkADQ0MWIxYThmLWE4YzItNDM4MS1hOTM0LTBhY2MzNGMzYmQwYQBGAAAAAACM0mZeOZNpTocvyM47Svru
BwBCjm8X6K-UR7VnjIWDMRNeAAAACWCRAADsGKiQ9_bQQ6Ey8tGr9WOeAADjdompAAA=
ChangeKey : CQAAABYAAADsGKiQ9+bQQ6Ey8tGr9WOeAADjcfvF
ClassName : IPM.Note
Subject : This is a test
BodyPreview : This is only a test. Howdy.
Body : @{ContentType=Text; Content=This is only a test. Howdy.
}
Importance : Normal
Categories : {}
HasAttachments : False
ParentFolderId : AAMkADQ0MWIxYThmLWE4YzItNDM4MS1hOTM0LTBhY2MzNGMzYmQwYQAuAAAAAACM0mZeOZNpTocvyM47Svru
AQBCjm8X6K-UR7VnjIWDMRNeAAAACWCRAAA=
From : @{Name=Test Mailbox; Address=testmbox@austin.utexas.edu}
Sender : @{Name=Test Mailbox; Address=testmbox@austin.utexas.edu}
ToRecipients : {@{Name=Jimi Hendrix (Test Mailbox); Address=its.jimi.hendrix@austin.utexas.edu}}
CcRecipients : {}
BccRecipients : {}
ReplyTo : {}
ConversationId : AAQkADQ0MWIxYThmLWE4YzItNDM4MS1hOTM0LTBhY2MzNGMzYmQwYQAQABqYlCcNlUc6te8jFvihy58=
DateTimeReceived : 2014-04-29T20:47:35Z
DateTimeSent : 2014-04-29T20:47:31Z
IsDeliveryReceiptRequested : False
IsReadReceiptRequested : False
IsDraft : False
IsRead : False
EventId :
MeetingMessageType : None
DateTimeCreated : 2014-04-29T20:47:34Z
LastModifiedTime : 2014-04-29T20:47:35Z
Attachments@odata.navigationLink : https://outlook.office365.com/EWS/OData/Users('its.jimi.hendrix@austin.utexas.edu')/
Messages('AAMkADQ0MWIxYThmLWE4YzItNDM4MS1hOTM0LTBhY2MzNGMzYmQwYQBGAAAAAACM0mZeOZNpTo
cvyM47SvruBwBCjm8X6K-UR7VnjIWDMRNeAAAACWCRAADsGKiQ9_bQQ6Ey8tGr9WOeAADjdompAAA=')/Att
achments
Now let’s get to the good stuff. Suppose we wish to send a message. The examples Glen provides don’t exactly make clear how to do this via PowerShell, but it isn’t that hard to work out from the API docs. The first step is to construct the JSON object containing the message data, then to use a POST command to create the message in Drafts. This is followed by using a SEND command (referencing the Id of the newly-created message) to actually send it. (If we wished, we could modify the draft prior to sending by updating the message with a PATCH method, but that is not illustrated here.)
PS C:\> $uri = "https://outlook.office365.com/ews/odata/Users('its.jimi.hendrix@austin.utexas.edu')/Drafts/Messages?'"
PS C:\> $contentType = "application/json;odata.metadata=full"
PS C:\> $body = "{
>> ""@odata.type"": ""#Microsoft.Exchange.Services.OData.Model.Message"",
>> ""Subject"": ""This is a send test"",
>> ""Importance"": ""High"",
>> ""Body"": {
>> ""ContentType"": ""HTML"",
>> ""Content"": ""I'm sending this via REST!""
>> },
>> ""ToRecipients"": [
>> {
>> ""Name"": ""Test Mailbox"",
>> ""Address"": ""testmbox@austin.utexas.edu""
>> }
>> ]
>> }"
>>
PS C:\> $new= Invoke-RestMethod -Uri $uri -Method POST -ContentType $contentType -Credential $cred -Body $body
PS C:\> $new
@odata.context : https://outlook.office365.com/EWS/OData/$metadata#Users('its.jimi.hendrix%40austin.u
texas.edu')/Drafts/Messages/$entity
@odata.id : https://outlook.office365.com/EWS/OData/Users('its.jimi.hendrix@austin.utexas.edu')/
Messages('AAMkADQ0MWIxYThmLWE4YzItNDM4MS1hOTM0LTBhY2MzNGMzYmQwYQBGAAAAAACM0mZeOZNpTo
cvyM47SvruBwBCjm8X6K-UR7VnjIWDMRNeAAAACWCcAADsGKiQ9_bQQ6Ey8tGr9WOeAADjds-1AAA=')
@odata.editLink : https://outlook.office365.com/EWS/OData/Users('its.jimi.hendrix@austin.utexas.edu')/
Messages('AAMkADQ0MWIxYThmLWE4YzItNDM4MS1hOTM0LTBhY2MzNGMzYmQwYQBGAAAAAACM0mZeOZNpTo
cvyM47SvruBwBCjm8X6K-UR7VnjIWDMRNeAAAACWCcAADsGKiQ9_bQQ6Ey8tGr9WOeAADjds-1AAA=')
Id : AAMkADQ0MWIxYThmLWE4YzItNDM4MS1hOTM0LTBhY2MzNGMzYmQwYQBGAAAAAACM0mZeOZNpTocvyM47Svru
BwBCjm8X6K-UR7VnjIWDMRNeAAAACWCcAADsGKiQ9_bQQ6Ey8tGr9WOeAADjds-1AAA=
ChangeKey : CQAAABYAAADsGKiQ9+bQQ6Ey8tGr9WOeAADjcpGv
ClassName : IPM.Note
Subject : This is a send test
BodyPreview : I'm sending this via REST!
Body : @{ContentType=HTML; Content=<html>
<head>
<meta http-equiv="Content-Type" content="text/html; charset=utf-8">
</head>
<body>
I'm sending this via REST!
</body>
</html>
}
Importance : High
Categories : {}
HasAttachments : False
ParentFolderId : AAMkADQ0MWIxYThmLWE4YzItNDM4MS1hOTM0LTBhY2MzNGMzYmQwYQAuAAAAAACM0mZeOZNpTocvyM47Svru
AQBCjm8X6K-UR7VnjIWDMRNeAAAACWCcAAA=
From :
Sender :
ToRecipients : {@{Name=Test Mailbox; Address=testmbox@austin.utexas.edu}}
CcRecipients : {}
BccRecipients : {}
ReplyTo : {}
ConversationId : AAQkADQ0MWIxYThmLWE4YzItNDM4MS1hOTM0LTBhY2MzNGMzYmQwYQAQAH2kuI7ID95PpX2r53t2T6w=
DateTimeReceived : 2014-04-29T22:00:17Z
DateTimeSent : 2014-04-29T22:00:17Z
IsDeliveryReceiptRequested : False
IsReadReceiptRequested : False
IsDraft : True
IsRead : True
EventId :
MeetingMessageType : None
DateTimeCreated : 2014-04-29T22:00:17Z
LastModifiedTime : 2014-04-29T22:00:17Z
Attachments@odata.navigationLink : https://outlook.office365.com/EWS/OData/Users('its.jimi.hendrix@austin.utexas.edu')/
Messages('AAMkADQ0MWIxYThmLWE4YzItNDM4MS1hOTM0LTBhY2MzNGMzYmQwYQBGAAAAAACM0mZeOZNpTo
cvyM47SvruBwBCjm8X6K-UR7VnjIWDMRNeAAAACWCcAADsGKiQ9_bQQ6Ey8tGr9WOeAADjds-1AAA=')/Att
achments
PS C:\> Invoke-RestMethod -Uri "$($new.'@odata.id')/Send" -Method POST -Credential $cred
I should note here that when testing this final Send command by leveraging an account with Send As rights on the test mailbox, I encountered an odd “Mailbox move in progress” error, despite the fact that such a move is NOT in progress for any of the mailboxes with which I was dealing. I suspect that this is a bug in this fledgling API. When I used the actual credentials of the account from which I was attempting to send, all worked as expected.
There are the basics in a nutshell. Note that I’ve only dealt here with reading and sending messages. I have not touched upon forwarding or replying, or upon dealing with other Exchange objects such as Contacts or Calendar items (including accepting or declining), but there should be enough here to provide a jumping-off point in experimenting with the API.
For Further Information
- Oneliner Mailbox access with Powershell in Exchange Online using the oData preview | Glen’s Exchange Dev Blog
- Office 365 APIs Preview
- 0 to 60: Developing apps for Outlook, Exchange Online, and Office 365 | Microsoft Exchange Conference 2014 | Channel 9
- Achieving better business productivity using Apps for Office and Office 365 | Microsoft Exchange Conference 2014 | Channel 9
- Invoke-RestMethod (TechNet documentation)
- InvokeRestMethod for the Rest of Us – Hey, Scripting Guy! Blog – Site Home – TechNet Blogs
- Representational state transfer – Wikipedia, the free encyclopedia
- JSON
- An Introduction to JavaScript Object Notation (JSON) in JavaScript and .NET
Now here’s an odd S/MIME quirk….
Update: March 5, 2014:
It would appear that the bug described in this post has been addressed in Office 365 Exchange Online OWA, presumably as part of a recently-announce rollout of S/MIME support. Now, when attempting to edit a signed draft in OWA, the following message pops up:
Updated Oct. 19, 2013
Consider the following scenario:
- Compose a message in an S/MIME aware client, such as Outlook.
- Set it to be signed, but don’t send.
- Save it to drafts.
- Login to OWA. (Here, I’m assuming Wave 15 Office 365 Exchange Online, which has a version of OWA which does not support the S/MIME control.)
- Find the saved message in Drafts.
- Resume editing.
- Send.
Here’s the odd part. If the recipient views the message in an S/MIME aware client, they will see the original draft, not the edited version. If they view the message in a non-S/MIME client, such as OWA, they will see the edited version.
When an S/MIME signed message is sent, it contains two multipart-alternative MIME sections. One is a clear-text version, for the benefit of non-S/MIME aware clients, and the other is the signed version, which has essentially been hashed with the sender’s private key, and is thus unintelligible to non-S/MIME clients.
When the message was edited in OWA, it only knew how to manipulate the clear text version of the message, not the signed part. When the final message is viewed in an S/MIME aware client, it will preferentially display the signed part, which is unmodified. In a non-S/MIME-aware client, it only displays the edited clear-text part.
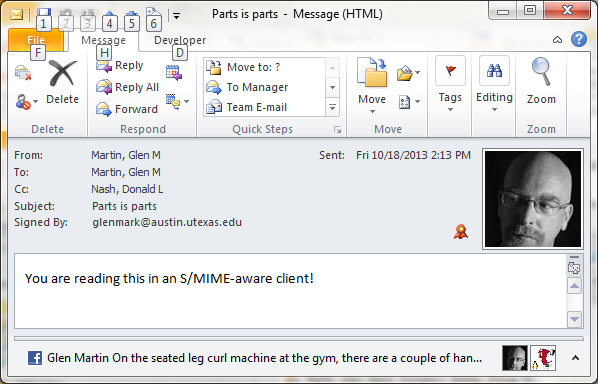
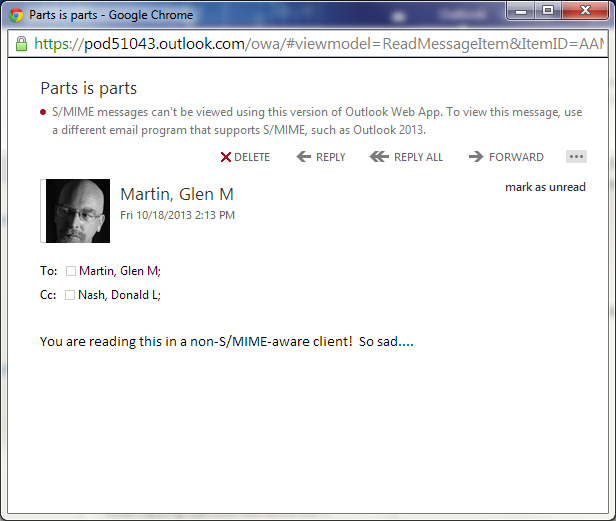
The following two screen grabs are of the same message which was composed as described above, one as viewed in Outlook (which is S/MIME-aware), the other as viewed in OWA (which is non-S/MIME-aware):
Above, we see the body text as it was in the signed draft saved from Outlook. Note that, since Outlook is S/MIME aware, it by default displays the original, unmodified signed MIME part.
Here, we see the version of the message as edited in OWA, the clear-text MIME part.
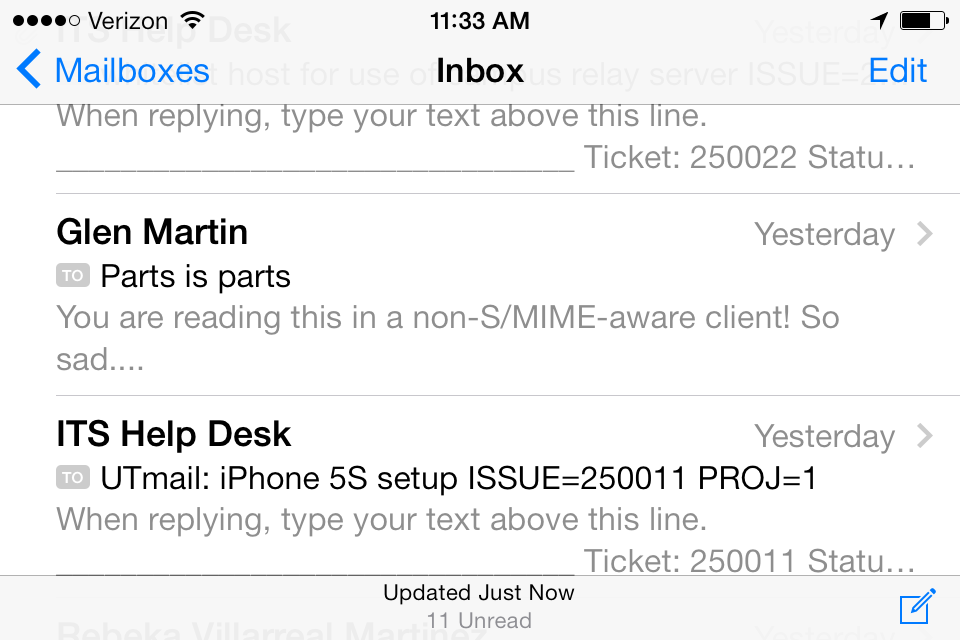
It is interesting to note some interesting behavior in this context with the Mail application in iOS. While that app is S/MIME aware, and displays the signed version of the message, the preview text in the message listing is pulled from the clear-text part:
Well, This is a Fun Bug….
We received a report of bug which had supposedly been fixed in Exchange 2010 SP1, but which is apparently manifesting is the version we are currently running, Exchange 2010 SP2 RU6. We were able to confirm the existence of this bug by reproducing it. Description: This issue manifests with Outlook 2010 (and possibly 2007, but I have not tested this), if one has an Outlook profile configured with an online connection to Exchange and an additional mailbox connecting to an IMAP4 or POP3 server. (The specific examples we have encountered and reproduced are IMAP4 connections to Gmail.) Sending an email with an attachment from the Gmail account results in the send attempt failing, and the following error being thrown:
Additionally, the message which failed to send ends up in the Outbox of the Exchange mailbox. It is necessary to remove this item from the Outbox for other send attempts to work.
Workaround:
The problem does not manifest if the connection to Exchange is configured to run in cached-mode.
The Fix:
We’ve reported the issue to Microsoft Support, and they have responded that this is a known issue, and that it will be corrected in SP3 Update Rollup 1. (We are already planning for an SP3 deployment, but currently have no ETA on the release of RU1 and the tentative release date for RU1 is May 11.)
Demystifying Mailbox Access Permissions
I frequently encounter confusion over granting access to a mailbox to other users, something which is a particularly important consideration when dealing with resource mailboxes (whose underlying Active Directory account is disabled).
There are three mechanisms for defining who can access a mailbox that is not their own, and two for defining who can send mail from it. Here is a quick overview:
I. Access to a mailbox:
1. “Full Access” rights:
Since true resource mailboxes (room, shared, and equipment mailboxes) are tied to a disabled Active Directory account, upon creation of the mailbox the Exchange admins assign “Full Access” permissions to accounts specified by those requesting the mailbox. Accounts with “Full Access” permissions are able to log directly into the resource mailbox with their own credentials in order to manage it (assigning delegates, setting sharing permissions, etc.).
“Full Access” rights are the highest level of access to a mailbox, and can only be set by the Exchange administrators. Because of this limitation, it is not uncommon to grant “Full Access” permission to mail-enabled group whose membership is managed by the mailbox owners.
Please note that setting delegates should be done through a dedicated Outlook profile, since only the delegate settings of the primary mailbox in a profile can be modified. Also note that having “Full Access” permissions does not grant rights to send mail AS that mailbox. More on this in a bit.
2. Folder sharing permissions:
Similar to sharing permissions in a file system, this is the simplest and most straightforward way to grant someone else access to a specific folder in a mailbox, such as the Inbox or Calendar. Different levels of permissions on each folder may be defined for each specified user. (Note that one of the sharing permissions, as see client-side, is called “Owner.” The same holds true for the delegate permissions discussed below. As such, the term “Owner” is somewhat overloaded.) Sharing permissions can be set by those with Full Access rights on a mailbox or those who themselves have sufficient sharing or delegation permissions on the given folder. Sharing permissions do not grant the ability to send from a mailbox.
3. Delegation
Delegation is a superset of sharing. When someone with Full Access rights to a mailbox assigns someone as a delegate to that mailbox (using a dedicated Outlook profile, since delegate settings can only be modified on the primary account in a given profile), three things happen under the hood:
a) Sharing permissions are set (per delegate, and per default folder) as above
b) The delegate is granted “Send-on-behalf-of” rights on the mailbox, which effectively allows them to send as the mailbox, with the caveat that the FROM field shows that the messages are sent “by USER-X on behalf of USER-Y”.
c) If the delegate is set to receive copies of meeting invites, a special hidden forwarding rule for this purpose is created within the mailbox.
There are several gotchas associated with delegates to be aware of:
a) Delegation tends to be over-used. Don’t use delegation if sharing permissions will suffice.
b) Watch out for delegation loops. (A is delegate of B, who is a delegate of C, who is a delegate of A.) Delegation for people mailboxes should generally follow the organization’s management structure.
c) When someone leaves the department, be sure to remove them from delegate lists before their mailbox goes away. Outlook tends to misbehave (throwing errors during attempts to modify delegations) when someone on a delegate list no longer has a mailbox, and the Exchange admins have to clean it up. (Microsoft’s programmers seem to assume that such individuals would no longer have AD accounts, so they don’t handle the situation very gracefully.)
II. Sending from a mailbox
There are two ways for someone to send FROM a mailbox that is not their own:
1. The “Send As” permission, which can only be applied by the Exchange admins. In much older versions of Exchange, this right came implicitly with “Full Access,” but that has not been the case for several versions now. We try to grant this right rather sparingly, as it is something of a nightmare from a security auditing standpoint. When several users have “Send As” permission on a mailbox, it is quite difficult (depending upon the how the logging level set on the server) to determine which one of them actually sent a given message, which can be problematic in a legal inquiry.
2. The “Send On Behalf Of” right, granted as part of delegation, discussed above.
Note that Exchange administrators have limited administrative visibility into delegation settings (short of actually logging into the mailbox), although we can see who has Send-on-behalf” rights. Delegate settings can ONLY be set by logging directly into the mailbox, and should therefore be set by those individuals who have “Full Access” rights.
Of Androids and ActiveSync Policies….
When we embarked last year upon upgrading our Exchange infrastructure from Exchange 2007 to Exchange 2010, one thing we had to do make that transition go smoothly was to rip out the Default Exchange ActiveSync Mailbox Policy. The reason for removing this default policy was to avoid issues with Android devices operating in a mixed 2007/2010 environment, the Android implementation of ActiveSync being based upon an obsolete version of the protocol. The removal of this policy had always been intended to be temporary, but we had held off since our testing revealed that re-application of the policy would result in a rather scarily-worded alert being generated on Android devices, causing end-user confusion.
Fast-forward to this last weekend. We applied Service Pack 2 and Update Rollup 4 to our Exchange environment. The process went smoothly, and we encountered no problems. But something unexpected happened, something that went quietly unnoticed in our testing.
The Default Exchange ActiveSync Mailbox Policy got re-created. And it got re-applied to all mailboxes.
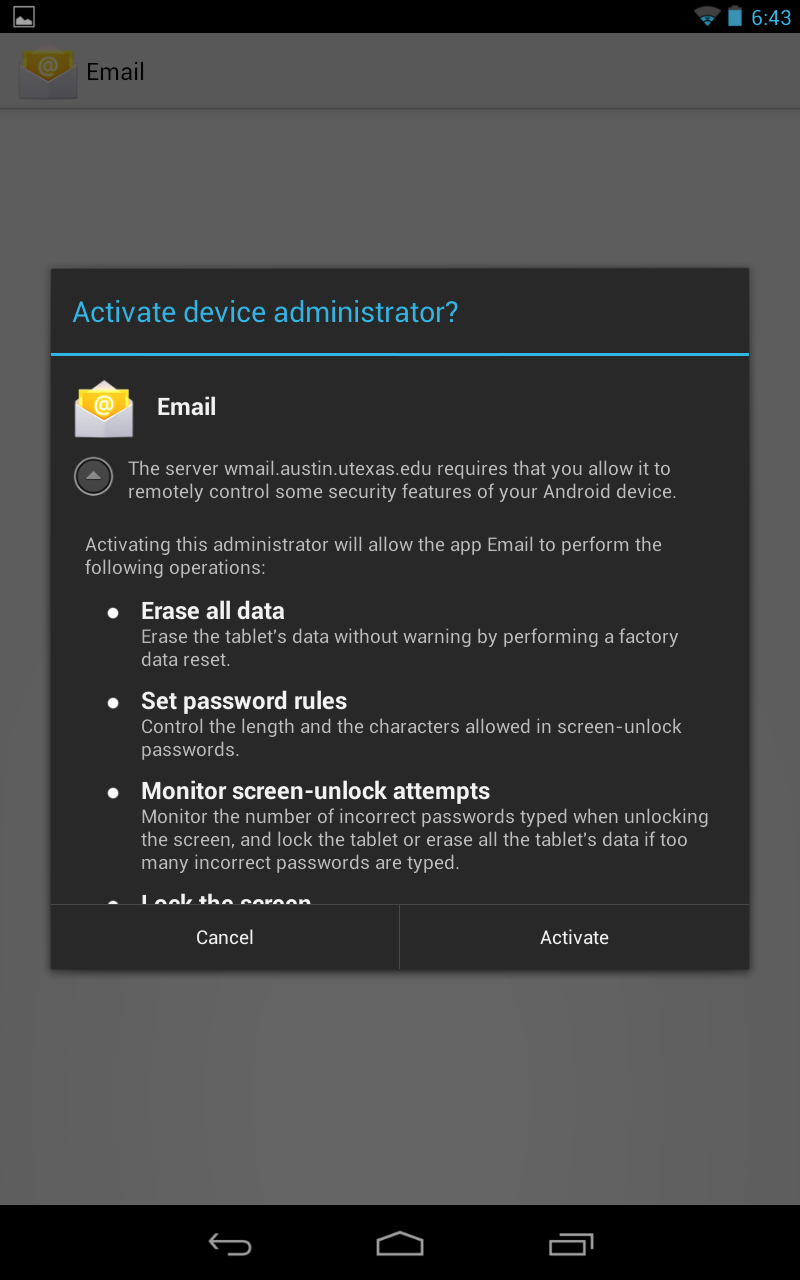
Something that we had wanted to eventually happen happened, but not at the time and manner of our choosing. And the Android devices issued that scary alert, with its implied message that we are taking complete control of their phone.
Among some of our users, this raised privacy concerns, and illuminated some gaps in our published documentation. Where is the written policy that we wouldn’t abuse the control offered to us by this policy object? There is none, something which we are in the midst of rectifying.
“So what exactly is an ActiveSync Mailbox Policy?” you might quite rightly ask.
When a device connects to Exchange via ActiveSync, the ActiveSync mailbox policy pushes down rules to the device about what it can and cannot do so long as that device is associated with the Exchange server. This includes rules which are very desirable in corporate or government environments, such as turning off cameras, forbidding removable storage, requiring device passwords, and giving users (and Exchange administrators) the ability to remotely wipe devices in the even that they are lost or stolen.
For most of these remote administration features, we are frankly not interested in using them. The default, out-of-box policy has these set in the most non-restrictive manner imaginable, and we have no plans to change that.
But, the part that we are interested in, remotely wiping devices, we wish to make available to our users. If it weren’t for that feature, we could quite happily get along without having a device policy in place on our servers. But that is an important one. The ability to remotely erase a lost or stolen device is critical, and it has been missing while we’ve been without that device policy.
There is an important point to be made here: remote wipes are user-initiated, exposed via the Exchange Control Panel (under Options -> See All Options in OWA, then selecting “Phone” in the left-hand navigation bar). While the policy also gives the Exchange administrators to the ability to initiate these wipes as well, we long ago, after extensive consultation with the Information Security Office, reached a consensus that WE would not initiate device wipes ourselves, leaving this to the device users. (One potential exception would be the instance of an explicit request from a user who has had a device lost or stolen and who is not where they are able to access OWA to initiate the wipe themselves.) There have been court cases where companies and institutions have been held liable for data remotely erased from user-owned devices. That is not where we wish to be.
In short, we aren’t trying to hijack your phones. This is a case of the association between an ActiveSync device and the Exchange server going into its normal state. Feel free to click the “Activate” button….
Meeting Organizer Appears in Subject of Exchange Calendar Events
I’ve noticed something odd. I’m not entirely sure when it started, and I’m not entirely sure why this “feature” exists (as it strikes me as being rather pointless); but, by default, the subject line of meetings gets replaced by the meeting organizer’s name in Exchange resource calendars.
The fix, happily, is quite simple. In the Exchange Management Console, open the Properties of the resource mailbox and go to the “Resource Information” tab. There, un-check the check-boxes labelled “Delete the subject” and “Add the organizer’s name to the subject”.
Alternatively, this can be set via the Exchange Management Shell with the following command:
set-mailboxcalendarsettings -identity meetingroom -deletesubject $false -addorganizertosubject $false
Troubleshooting MSExchange Common 106 Events
I’ve been periodically getting splashes of events like the following in the App Event Log on one of my Exchange servers:
Performance counter updating error. Counter name is *, category name is MSExchange Search Indices. Optional code: 3. Exception: The exception thrown is : System.InvalidOperationException: Custom counters file view is out of memory.
In an effort to troubleshoot this, I’ve taken the steps suggested here, here, and here. Within the Exchange Management Shell, I’ve run the following commands:
add-pssnapin Microsoft.Exchange.Management.PowerShell.Setup
New-PerfCounters -definitionfilename “$exinstall\Setup\Perf\RpcClientAccessPerformanceCounters.xml”
New-PerfCounters -definitionfilename “$exinstall\Setup\Perf\AdminAuditPerfCounters.xml”
New-PerfCounters -definitionfilename “$exinstall\Setup\Perf\ResourceHealthPerformanceCounters.xml”
New-PerfCounters -definitionfilename “$exinstall\Setup\Perf\ThrottlingPerformanceCounters.xml”
New-PerfCounters -definitionfilename “$exinstall\Setup\Perf\MiddleTierStoragePerformanceCounters.xml”
New-PerfCounters -definitionfilename “$exinstall\Setup\Perf\IsMemberOfResolverPerfCounters.xml”
New-PerfCounters -definitionfilename “$exinstall\Setup\Perf\ADRecipientCachePerformanceCounters.xml”
New-PerfCounters -definitionfilename “$exinstall\Setup\Perf\ExchangeTopologyPerformanceCounters.xml”
New-PerfCounters -definitionfilename “$exinstall\Setup\Perf\ExSearchPerformanceCounters.xml”
New-PerfCounters -definitionfilename “$exinstall\Setup\Perf\ExSearchCatalogPerformanceCounters.xml”
We shall see if that does the trick….
Quick Tip: How to do a screen capture of an individual window within an RDP session
The usual trick of hitting Alt-Print Screen doesn’t work within the context of a Remote Desktop session. However, if you hold down the Alt key, the Ctrl key, and the – key (and this has to be the minus key on the numeric keypad) while hitting “Print Screen”, the active window within your RDP session will be captured to the clipboard. Weee….