
![]()
Zoom is an easy-to-use (and FREE) video conferencing tool available for you AND your students.
Zoom is not the university’s official video conferencing tool. However, work is ongoing that may change that in the coming months.
If you’d like to learn more, lot’s of Zoom tutorials are available here.
Or, get started right now with the basics of how to use Zoom:
- Create a Zoom Meeting
- Invite People to Your Zoom Meeting
- Record Your Zoom Meeting
- Share Your Zoom Recording
Create a Zoom Meeting
There are two ways you can create a meeting in Zoom:
- you can create them from your account page on the Zoom.us website or,
- you can download and install the desktop app to create them right from your computer.
To create your meeting from the Zoom.us website:
- Sign in to your Zoom account at Zoom.us
- If you haven’t created an account yet, refer to Getting Started with Zoom for more information.
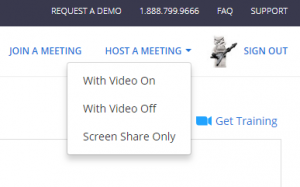
- Click Host a Meeting in the upper right-hand corner.
- Next, select whether you would like to conduct your meeting with video on or off, or would like it to be screen share only.
- If you’re unsure which option to choose, it’s likely best to start with video on and see if that suits your needs (and change it if not).
- Next, Zoom will attempt to open the meeting software. Follow the on-screen instructions to continue. If prompted to do so, download and run Zoom. Otherwise, follow the prompt to Open Zoom Meetings.
- Your meeting opens automatically. From this point, follow the on-screen instructions to use your computer’s audio or join by phone, and test and select your webcam.
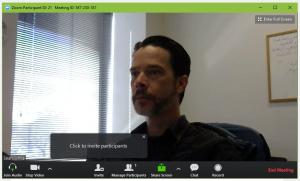
- Once your audio and video are set up and working, you will see yourself (and any other attendees) on screen as in the example below.
- Note: you can also use any of the on-screen controls at any point during your meeting to invite people, share your computer screen, record the meeting, and so on.
- Note: you can also use any of the on-screen controls at any point during your meeting to invite people, share your computer screen, record the meeting, and so on.
Depending on the specific settings that you select, your meeting will likely look something like the image below:

To create your meeting from the desktop app:
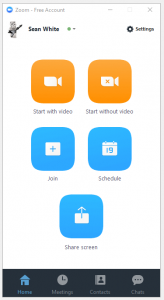
The first time you use Zoom, it will download and install the desktop app to your computer. Once you open the app, the steps are the same as those listed above for creating a meeting from the website.
Here’s an example of what the desktop app controls look like:
Note: there is also a mobile app that allows you to use Zoom from your smart phone or tablet. To use Zoom from your iPhone or other mobile device, visit the Android or iPhone app store and install the free Zoom app to get started.
Invite People to Your Zoom Meeting
There are two ways to invite people to your meeting:
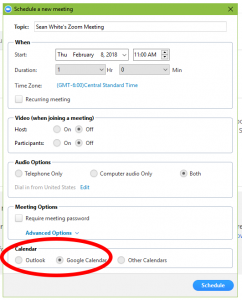
- You can schedule your meeting ahead of time and invite people using Outlook or Google Calendar meeting invitations the same way you would invite them to a conventional, face-to-face meeting. This will be the best option when you know in advance that you will be hosting a Zoom meeting.
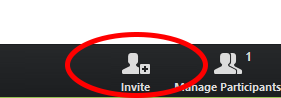
- Or, you can start a new meeting on the fly, and then invite people to the meeting in real time. To do this, simply click Invite from the meeting controls at the bottom of the meeting screen. This option will be best when you have an impromptu meeting that you need to get started right away, likely with only 1 or a few other people.
In either case, the people you invite will receive an email notification which includes a hyperlink to get them into your Zoom meeting.
Record Your Zoom Meeting
There are two ways you can record your Zoom meeting:
- If you are scheduling your meeting ahead of time, you can use the Advanced Options section of the scheduler and select Record the meeting automatically on the local computer. This option will begin the recording immediately once your meeting starts and save the recording to your computer.
- If you are conducting an impromptu or on-the-fly meeting, you can start recording at any point during your meeting using the meeting controls at the bottom of the screen. Simply click Record to begin (or end) a recording of your meeting that will be saved to your computer when you’re finished.


Share Your Zoom Recording
Meetings that you record in Zoom will create and save an mp4 video file on your computer. If, for any reason, you want to share that video with anyone, there are lots of different options available to you. Here are two options that are recommended and are most likely to suit your needs.
Option 1: Upload the video to your Canvas course:
This is best when you need to share the video only with a specific class or group of students. This is also recommended for shorter videos (in the 10 – 30 minute range), as larger files will eventually take up too much space in your Canvas course.
Option 2: Upload the video to your UT Box or Google Drive account:
This is best when you need to share the video with anyone who is not enrolled in a Canvas course or with lots of different people who may not be affiliated with UT. This is also recommended for longer term storage and sharing purposes as well as for larger video files which may be too big to be stored in Canvas.
Refer to the Ed. Tech blog for more information about getting started with UT Box and Google Drive.
Click here to download this primer as a Word document.
If you have any questions, or would like to know more, please don’t hesitate to contact me at your convenience.
Leave a Reply
You must be logged in to post a comment.