Note: this page is not complete! But feel free to peruse:
To improve remote learning with covid19 making it safer to teach online for Fall 2020, my husband and I built a home lightboard. We did not invent this – we watched a LOT of videos and read a lot of blogs with ideas, but unfortunately didn’t find any of them “complete” enough for my liking. I’m sharing my plans/process below, hoping this gets you going/glowing (ha!). You’ll see it includes my very favorite thing in the world, 80/20 extrusion, which is like Tinker Toys for adults.

First, a 2D/3D funky sketch of the 80/20 layout. I ordered everything from McMaster-Carr, because shipping is FAST. The exception being – I had 2 custom cut 18″ pieces because I don’t have a saw at home, only at lab. They took over a week to arrive, but everything else arrived within 1-2 days. All part numbers for the connections I chose are listed in the diagram, minus the 1″ extrusion, which is easy to find (7x 6′ long bars, 2x 18″ custom-cut bars). Materials cost $416, plus tax and shipping was just under $500 total for the aluminum framing. (If you can’t read them, email me and I’ll forward my receipts so you can duplicate the order).
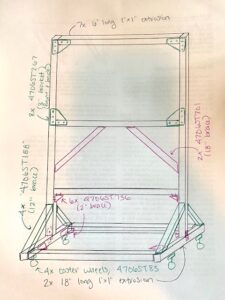
We wanted a board 6′ wide, 3.5′ tall just for the glass, to accommodate me at 5’4″ and my husband at 5’11” tall. I measured our doorways to make sure it would accommodate the structure — PLUS additional space for casters (4″) and our bottom cross bars (1″). The full structure is 6’5″ tall, which by my measurements fits through the doorways in the house. The base is 6’2″ wide by 18″ deep. We initially wanted this to live in the guest bedroom. However – upon building it, we discovered it can’t turn the corner to get in, due to the 18″ dimension of the base. So we moved it to the master bedroom, thinking we could roll it out to the screen porch when not in use — but the bedroom door to the porch is apparently shorter than all other doors in the house, so basically — this board is now 24/7 in the master bedroom. Oh well.
I exclusively used 1″ extrusion because it’s lightweight and easy to maneuver. You might feel more comfortable with 2″ if your budget allows. Glass is HEAVY. But ours is doing fine (knock on wood) and if you design a smaller board, you won’t even think about it. Yes, it wobbles and feels slightly flimsy, but honestly I think it’s stable for our purposes. The dogs have mostly ignored it, and thankfully there have been no scratches from sharp corners at the base.
Next – lighting! How does this glow?? We bought cheap LEDs from Amazon (LINK) that nestle right into the grooves of the 80/20. Have patience getting it into the corners, but it will work — just delicately push it in and you can have a single string of LEDs in your frame. That’s the magic of 80/20 – a continuous groove even for corners, and an exit strategy at the top for you to still connect the power source and have any leftovers hanging out. No fancy tricks were needed. Our LEDs start at the upper left (which was the side closest to an outlet, so we could plug them in!), go down, across the bottom, and up the right side. There’s a bit left over but not enough to cross the entire top, so we just have it hanging out and will likely snip it off at some point. These photos show the LEDs in the frame, no glass yet. I saw links for fancy remote-controlled battery-operated LEDs but just did not want to deal with them. Ours is plug and go, easy to replace when needed (slide the glass out, replace LEDs, slide glass back in!).
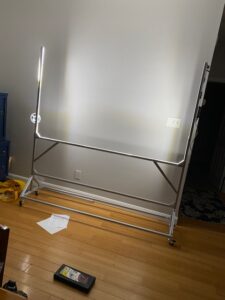
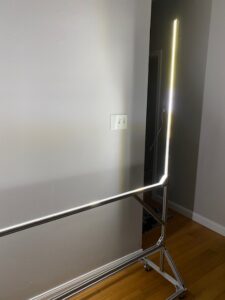
Alright – next, the glass. As I said, we wanted a 6′ x 3.5′ pane of glass. After a lot of research, we decided to splurge on Starphire ultra-clear glass. Something about iron being removed so there’s no haze or any interference. We ordered it well over a month ago, with a supposed 10-day delivery, but … nothing. Thankfully the company is letting us “borrow” a cheap pane of glass for now so we can move forward with teaching, but there are many defects and hazy areas that simply do not wash away. So, we’re anxious for the real glass to arrive. I ordered 1/4″ thick glass (feels so thin and delicate!) because it fits right into the groove of the 1″ 80/20, so no additional support structure is needed for the glass. It is still very very heavy, even being so thin. Because it goes INTO that groove, you may realize — it slides into the 6′ wide top and bottom supports easily, because we snugged them in to the glass, BUT it cannot go into both the left and right vertical supports. If we had trimmed about 1/4″ off of the 6′ horizontal supports (or just ordered glass that was say, 6′ 1/4″ instead of 6′ wide), then it would also snug into the left/right grooves. So far this does not seem to be an issue for us, because the top/bottom are sufficient. I think we pushed the glass into the left vertical rail, so it’s actually supported on 3 sides, and there’s a tiny visible gap on the right, which doesn’t cause any problems. Yes, the weight of the glass is sitting on the LEDs, squashing that cheap little strip. No, it doesn’t seem to be a problem yet. Note – the glass rattles a bit because there’s a tiny gap between the glass and the 80/20 groove sidewalls. We have a few ideas to fix it, but for now I just gently push on the glass with my non-writing hand, and it settles down completely. (Once we have a fix for this, I’ll update this page).
For assembly, we put together the entire frame, minus the very top cross-bar. We put the glass on the bed, laid the structure on the bed to surround the glass, and gently maneuvered the metal and glass to get the glass securely into the bottom groove (with the LEDs already in place), then snugged the top cross-bar into place to hold it secure. There is NOTHING ELSE holding the glass in place, just the grooves of the 80/20, so it is critical that you have the 80/20 rails perfectly aligned with the glass. This is definitely a 2-person job, especially with glass this big. Double and triple-check each other’s tightening of all the screws and alignment. Then very gently and slowly bring it back to standing, if/when everything feels secure.
For a uniform dark background, we hung a black curtain on the wall. LINK. Any matte black fabric will do. I used tiny scissors to cut holes in it, through which I initially put in fancy metal grommets. Due to how thin the curtain was, the grommets have mostly fallen out. So – skip the grommets – they were an infuriating waste of time – and just cut your holes in the cloth low enough in the fabric (2-3″ from the seam) that if they start to tear, you won’t have an immediate disaster.
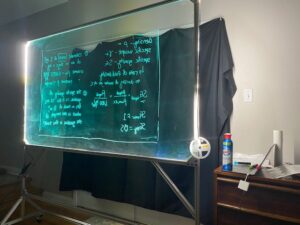 I love that my bedroom now has holes in the wall, just to allow us to teach. First we put cup-hooks into the door frame (of the darned short door that leads to the porch) because I didn’t want any messy drywall issues. But — it was too low from the camera perspective. In this photo, you can see that with the low curtain, there’s a very limited amount of the board we’re able to use – total waste of space and effort. So we used little picture-hanging hooks in the drywall, because they just use a tiny finishing nail, and the black curtain hangs from those hooks. You want the curtain to be SMOOTH, not drapey (we learned by mistake on the doorframe mount) so measure super carefully to make sure your holes in the curtain and your hooks on the wall are perfectly lined up. Our holes are ___ off the ground, and it works well for this board.
One extra thing – in selecting where you want this board to live, you want to find a space that’s DARK. We unfortunately have a large skylight in the master bedroom (hence why we wanted the guest room, but … couldn’t turn the corner!). So right now, we record our lectures after sunset, and can only use them for asynchronous lectures due to it being too bright during the day. We’re getting shutters installed on this window (seriously – we are committed to this board!) but also, the shutters will be great for letting me sleep in when we have those awful daylight saving transitions anyway.
Ok – onto cameras and electronics. I have a MacBook Pro. I downloaded OBS, which is where I do all the recording. My laptop sits next to me while I’m recording. The laptop is connected via a long USB cable to my cell phone (iPhone 10 – the one with 3 cameras…). On my cell phone, I open NeuralCam Live, which mirrors the image left/right in real time – so I can stream or save. In OBS, you can find that camera once the USB is connected. I believe this will also work with Zoom directly for live-streaming but I haven’t tested it out yet. This nifty little TRIPOD is great – it has a phone mount right on it. It’s a cheap and flimsy-feeling tripod which I would never put a “real” camera on, but for this, it’s great. We open it to the maximum height, which works well for this board. The microphone on my laptop is sufficient for capturing my voice. My husband bought an external mic that he clamps onto the frame, but I’m not sure it makes much difference.
Markers are Neon Expo brand. The different colors sort of show up differently, but it’s not a stark contrast, especially if you have color-blind students. They write very easily without you needed to push into the glass, so take it easy! We put the brakes on the wheels so the board doesn’t roll away, though I often rest a foot on the bottom cross-bar for peace of mind. We ordered microfiber cloths for cleaning. Spray on a foam glass cleaner, spread around with one cloth (it’ll make a smeared mess – don’t worry!) then use the other (dry) cloth and you’ll be able to wipe it 100% clear. This seems to be the fastest route. The markers are stickier than normal whiteboard markers, so if you try to erase something with your finger, you’ll make a big neon smudge. Keep the cloths handy instead for quick dry-erasing if needed.
I try to wear dark clothes when using the board, to let the viewer focus on the ink, not my distracting brightness. We’re playing with putting a spotlight (directed floor lamp at the moment) on the speaker from the side, to reduce the glare of our cheap stand-in glass, and improve the contrast. We’re still debating whether this works; will update once the verdict on optimal lighting is in.
